Tutorial
The JSF libraries (Version 1.1 or higher) as part of the Java Web Services Pack which can be downloaded from Sun.
A servlet engine to deploy your JSF web application. You can use Tomcat which is part of the Web Services Pack.
Copy the formbuilder.zip
into a new directory.
Unzip the file.
Run the application with: java
-jar formbuilder.jar
The new JSF library is framework for
creating web applications quick and easy. The library shields the
developer from writing complex code to process the request from a
HTML form. Despite JSF's clear and easy to understand concepts the
definition and backing code for a form is spread into at least 3
different files. The design of a form is defined in a JSP using the
JSF tag libraries, the code for its data model is defined a Java Bean
(called the backing bean), while the wiring between the bean and the
navigation between the forms is done in the JSF configuration file
(faces-config.xml).
The goal of the JSF FormBuilder tool
is to ease the initial creation of a new JSF form by auto generating
the JSP, the backing bean and the definitions in the
faces-config.xml.
A form generated by the JSF FormBuilder consists of a number of fields (text fields, check boxes, list boxes, radio boxes etc.) and a set of buttons for submitting the form. For each form the JSF FormBuilder creates:
the JSP with the JSF tags for the form,
the source and the class file for a java bean called the backing bean with properties for each field, methods to handle the actions from the submit buttons and methods for validating the fields.
the necessary tags in the JSF
configuration file (usually called faces-config.xml)
for the backing bean registration and the navigation handling.
the tags to setup JSF in the web
application deployment descriptor web.xml.
Starting with the automatic created code for the form it is much easier to add the business functionality to the backing bean and modify the design of the form in the JSP than writing everything from scratch.
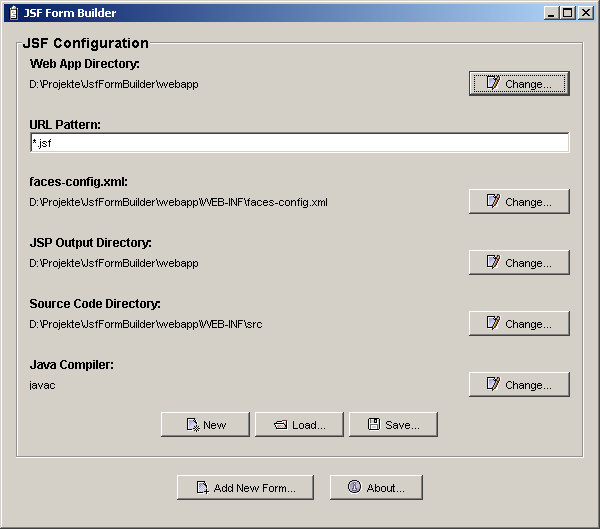
The application starts with the following window:
In order to setup your JSF environment you have to:
Set the directory for your web
application (<webapp>)
for which you want to create the forms. By default it creates a
<current>/webapp/
directory in the directory (<current>)
where the FormBuilder has been started from. If the application
finds the web application deployment descriptor in
<webapp>/WEB-INF/web.xml
it reads the settings for the URL pattern and the JSF configuration
file.
Define the source directory for
the source code of the generated backing bean. By default it uses
the <webapp>/WEB-INF/src/
directory which is created if it doesn't exist.
If you don't start from an
existing JSF web application but create a new one from scratch copy
the following files to the <webapp>/WEB-INF/lib/
directory: - jsf-api.jar
-
jsf-impl.jar
- jslt.jar
- commons-beanutils.jar
-
commons-collections.jar
- commons-digester.jar
-
commons-logging.jar
- html_basic.tld
- jsf_core.tld
-
web-facesconfig_1_0.dtd
- web-facesconfig_1_1.dtd
Only
the jsf-api.jar has to be found in
<current>/lib/
because it is necessary to compile the backing bean automatically by
the FormBuilder. All other files for the JSF web application
(web.xml, faces-config.xml)
are created or modified automatically by the FormBuilder.
If you can't run the JDK 1.4
Java compiler javac directly from the
command line, change the Java Compiler setting and point to the
javac.exe (usually in the <JDK>/bin/
directory) you want to use for compiling your backing beans.
The JSF and web application
configuration can be saved to disk and reloaded to add more forms
later. It uses the Java Bean XML file format, defined by the JDKs
XMLEncoder class.
In order to create a new form press the Add New Form... button. It brings up a new dialog with several tabs to define your form settings.
This allows the setup of the basic data for the form:

Enter the name of the new form, it's title and the class name for it's backing bean (including package) and its scope. If the Form title check box is selected the form title is displayed on the page.
In the Fields tab you define the fields of the form:

The Field column defines the name of the field in the backing bean, the Label column its label in the form. The Type of the field determines the form component and the type in the backing bean. It can be:
|
Field Type |
Component |
Backing Bean Type |
|---|---|---|
|
Text |
Text field (single line) |
|
|
Boolean |
Check box |
|
|
Message |
Parameterized Text. |
|
|
Label |
|
none |
|
Image |
Image |
none |
|
Combobox |
Combo box |
|
|
Radiobox |
Radio boxes |
|
|
Listbox |
List box (multi selectable) |
|
With the help of the Value column you
can define default values for the fields. The image field interprets
the Value as the URL of the image. The
multi value fields (combobox, radiobox and listbox) use the ';'
character to separate the possible values.
The Required column allows to define a field as required, where a user has to enter something in order to submit the form.
New fields can be added with the Add... button. Remove removes the currently selected field. With Up and Down the fields can be reordered.
Each field results in corresponding get/set<Field>
methods in the backing bean. In addition for each text field the
application creates a validation method called validate<Field>.
In the Buttons tab you define the buttons of the form which are placed beside each other on the form:

You can choose from three different buttons types:
standard submit buttons,
links and
image buttons.
The Action of each button is the
resulting command when the button is pressed. Therefore for each
button there is an action method defined in the backing bean. The
name of this method is <action>Action
and it returns the <action>
value. In the <navigation> section
of the faces-config.xml there is a
translation from the <action>
value into the URL of the Target View.
The Caption defines the buttons caption or the URL to the image for the image button respectively.
New buttons can be added with the Add... button. Remove removes the currently selected button. With Up and Down the buttons can be reordered.
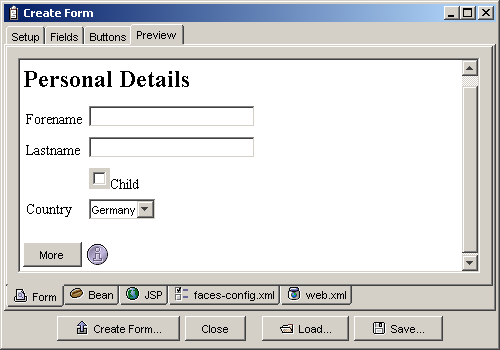
This tab section allows the preview
of the form, the generated JSP, the backing bean source code and the
modifications to the faces-config.xml
and web.xml files before the form is
generated.

When you are happy with your form it
can be generated. Press the Create Form...
button and an information dialog pops up, explaining what steps are
going on. If the JSP or the backing bean already exist, you are asked
to overwrite the files (as well as the backing bean section in the
faces-config.xml).
Start your servlet server and (re)deploy your web application. The new form is ready for testing and should work already. You should get something like:
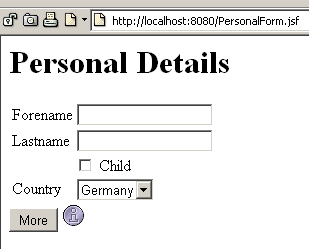
(Make sure your include the URL pattern for the JSF servlet in your URL).
If you are not happy with your form, you can change it in the still open Create Form dialog and regenerate the form.
Form definitions can be saved to disk and reloaded for later change or as the basis for another form. It uses the Java Bean XML file format, defined by the JDKs XMLEncoder class.
Change the JSP (e.g. add HTML tags, reorder and modify the generated JSF tags) to change the page design of your form.
If you want to use a custom code to
validate certain fields you have to modify the validate<Field>
method in the backing bean. E.g if your input field is called name
you need to change the method:
validateName(javax.faces.context.FacesContext
context, .
javax.faces.component.UIComponent component,
Object value)
throws
javax.faces.validator.ValidatorException
If the content of the field is invalid throw a
new
ValidatorException(.
new
javax.faces.application.FacesMessage(String errorMessage))
If you want submit different action
codes depending on the entered data or you want to update your
backend system you have to modify the <action>Action
method in the backing bean for the button with the action <action>.
E.g if your button has the action submit
look for the method submitAction().
To remap the action to a different
URL modify the faces-config.xml. Look
for the section <navigation-rule>
with a view-id which has the name of the
forms JSP.